In this blog post, I’m going to quickly summarize how to create a Docker Jenkins image and how to make it working. I’m going to demonstrate how to create two images, the first with OpenJDK 8 and the second with Oracle JDK 8 installed. So let’s get started.
The following Dockerfile creates a Docker Jenkins image based on the OpenJDK image. First, it updates existing packages, installs curl, git and nano as a text editor. Next, Maven and Jenkins are downloaded and installed. The only Jenkins plugin that is installed, is the greenball plugin. All other required plugins are easier to install via the Jenkins GUI console as this will also resolve plugin dependencies. Lastly, port 8080 is exposed and Jenkins is run.
This file contains bidirectional Unicode text that may be interpreted or compiled differently than what appears below. To review, open the file in an editor that reveals hidden Unicode characters.
Learn more about bidirectional Unicode characters
| FROM openjdk:8 | |
| RUN apt-get update -qq && apt-get install -qq curl git nano && apt-get clean | |
| RUN curl -sf -o /opt/apache-maven-bin.tar.gz http://archive.apache.org/dist/maven/maven-3/3.3.9/binaries/apache-maven-3.3.9-bin.tar.gz; \ | |
| tar xzf /opt/apache-maven-bin.tar.gz -C /opt/; \ | |
| rm /opt/apache-maven-bin.tar.gz; \ | |
| ln -s /opt/apache-maven-3.3.9 /opt/maven | |
| ENV MAVEN_HOME /opt/maven | |
| ENV JENKINS_HOME /opt/jenkins | |
| ENV JENKINS_MIRROR http://mirrors.jenkins-ci.org | |
| RUN mkdir -p $JENKINS_HOME | |
| RUN curl -sf -o /opt/jenkins/jenkins.war -L $JENKINS_MIRROR/war/latest/jenkins.war | |
| RUN mkdir -p $JENKINS_HOME/plugins; for plugin in greenballs; \ | |
| do curl -sf -o $JENKINS_HOME/plugins/${plugin}.hpi -L $JENKINS_MIRROR/plugins/${plugin}/latest/${plugin}.hpi; done | |
| VOLUME $JENKINS_HOME/data | |
| WORKDIR $JENKINS_HOME | |
| EXPOSE 8080 | |
| CMD [ "java", "-jar", "jenkins.war" ] |
Creating a Oracle JDK image is a bit more costly. First of all, an Ubuntu image with Oracle JDK has to be created. Launchpad offers a Oracle Java installer which automatically downloads and installs Java.
This file contains bidirectional Unicode text that may be interpreted or compiled differently than what appears below. To review, open the file in an editor that reveals hidden Unicode characters.
Learn more about bidirectional Unicode characters
| FROM ubuntu:latest | |
| RUN apt-get update -qq && apt-get install -qq software-properties-common && apt-get clean | |
| RUN \ | |
| echo oracle-java8-installer shared/accepted-oracle-license-v1-1 select true | debconf-set-selections && \ | |
| add-apt-repository -y ppa:webupd8team/java && \ | |
| apt-get update && \ | |
| apt-get install -y oracle-java8-installer && \ | |
| rm -rf /var/lib/apt/lists/* && \ | |
| rm -rf /var/cache/oracle-jdk8-installer |
In order to indicate that this image contains Oracle JDK 8, it can be tagged (on github) with version 8. This image is the base image for the following Jenkins image. which exactly looks the same as the one with OpenJDK configured.
This file contains bidirectional Unicode text that may be interpreted or compiled differently than what appears below. To review, open the file in an editor that reveals hidden Unicode characters.
Learn more about bidirectional Unicode characters
| FROM renewinkler/ubuntu-oraclejdk:8 | |
| RUN apt-get update -qq && apt-get install -qq curl git nano && apt-get clean | |
| RUN curl -sf -o /opt/apache-maven-bin.tar.gz http://archive.apache.org/dist/maven/maven-3/3.3.9/binaries/apache-maven-3.3.9-bin.tar.gz; \ | |
| tar xzf /opt/apache-maven-bin.tar.gz -C /opt/; \ | |
| rm /opt/apache-maven-bin.tar.gz; \ | |
| ln -s /opt/apache-maven-3.3.9 /opt/maven | |
| ENV MAVEN_HOME /opt/maven | |
| ENV JENKINS_HOME /opt/jenkins | |
| ENV JENKINS_MIRROR http://mirrors.jenkins-ci.org | |
| RUN mkdir -p $JENKINS_HOME | |
| RUN curl -sf -o /opt/jenkins/jenkins.war -L $JENKINS_MIRROR/war/latest/jenkins.war | |
| RUN mkdir -p $JENKINS_HOME/plugins; for plugin in greenballs; \ | |
| do curl -sf -o $JENKINS_HOME/plugins/${plugin}.hpi -L $JENKINS_MIRROR/plugins/${plugin}/latest/${plugin}.hpi; done | |
| VOLUME $JENKINS_HOME/data | |
| WORKDIR $JENKINS_HOME | |
| EXPOSE 8080 | |
| CMD [ "java", "-jar", "jenkins.war" ] |
Of course, it would have been possible to configure this image with only one Dockerfile. However, that would have less corresponded to the modular idea. In this way, one is flexible and the base image can be reused.
The most eleagnt way to create Docker images out of dockerfiles is to configure an automated build on Dockerhub. I’m not going in these details here, but I show you how to build the image manually. The docker image can be build
docker build . -t jenkins-oraclejdk
and then run as follows
docker run -itd -p 8080:8080 --name jenkins jenkins-oraclejdk
Next, open a web browser and type in http://192.168.99.100:8080/ Once Jenkins is started, an input will appear to create a first user:

Next, Jenkins has to be unlocked.
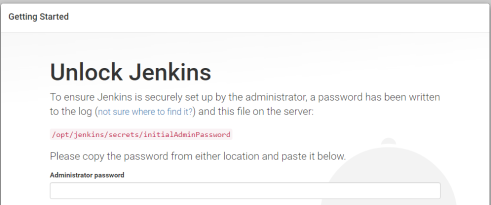
In order to this, one have to connect to the docker container and get the initial admin password. The following docker command, let you connect to the container.
docker exec -it jenkins /bin/bash
Navigate to the corresponding folder and open the intialAdminPassword file with nano.
nano intialAdminPassword
Double click the password and press enter to copy the password and leave the editor via Ctrl+X. Exit the container by typing in ‚exit‘ and paste the password to the corresponding input field to unlock Jenkins. That’s all. At last, you have the opportunity to customize Jenkins, e.g. by installing additional plugins.
